Skip to content
FREE US SHIPPING $149+ / CALL US (877)220-7510
FREE SHIPPING $149+ CALL US (877)220-7510

Language

Country

Your Cart (0)

View cart

Your cart is empty

Continue shopping

Blu3 Crash Course: How to Set Up the Nomad like a Pro

Blu3 Crash Course: How to Set Up the Nomad like a Pro

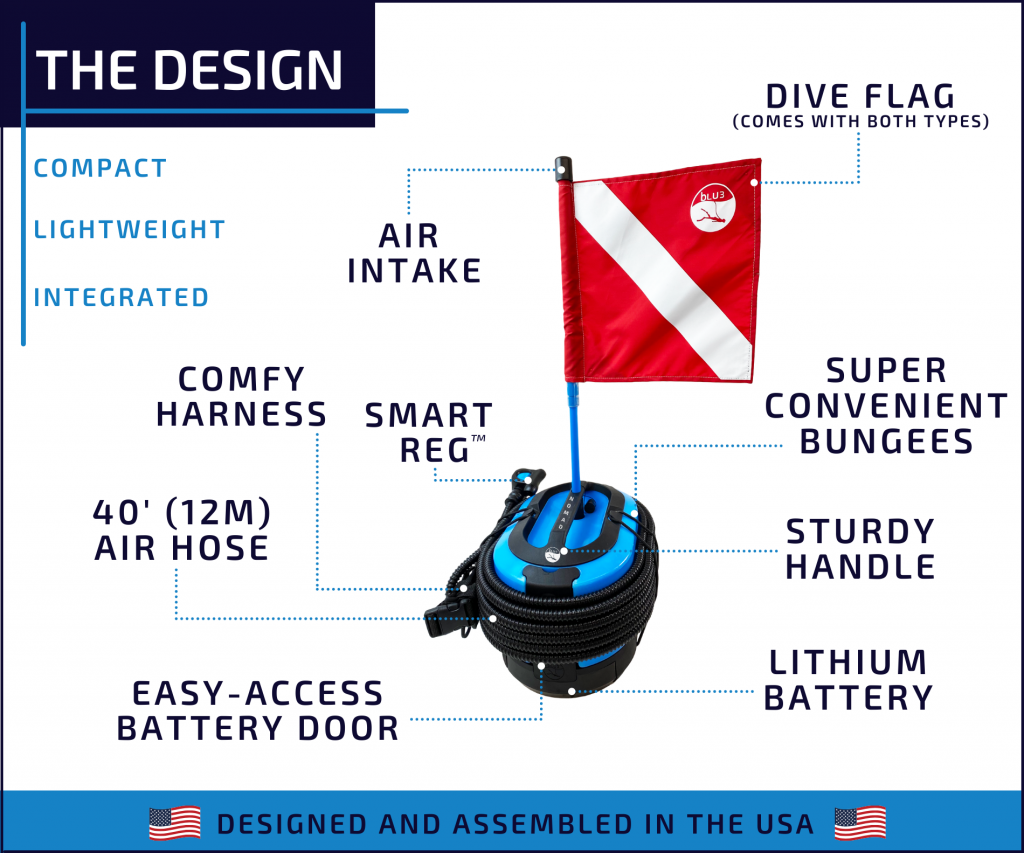
For enjoying a unique scuba diving experience, you need to learn first the basic setup and safety measures of your Blu3 Nomad equipment.

In this article, we will explain everything you need to know about setting up your Nomad.

https://www.diveblu3.com/wp-content/uploads/2021/06/the-design-1024x853.png

Laying out the Blu3 Nomad equipment

  • Start by laying out your gear on a clean, wide surface. Blu3 recommends using a redundant air source (like spare air) when scuba diving, so remember to pack it up. 
  • When you pull out the Nomad, you will notice the air hose and the harness already coiled up and the battery will be installed as well but not connected
  • Lay out the dry bag float, the snorkel tube, dive flag, bungee ball ties, the battery charger, and all the secondary items and gadgets you'll need for the dive.

Setting up the Blu3 Nomad

  • Remove the battery, plug in the charger, and let it charge. The red light indicates charge in the process; the green light that is ready to use. Once it is charged, press the LED gauge on the battery to test that the four LED light up.
  • Unpack the air hose and set it aside in a safe place far from sharp objects that could damage its coating.
  • The most crucial step from this phase is to remove the Intake Plug before connecting the battery to Nomad.
  • Install the dive flag on the upper half of the snorkel tube with the drip cap on top . Plug the snorkel tube into the intake of the Nomad.
  • Now, connect the battery. Push down on the connector tab as you insert it into the Nomad battery completely. The musical beep will let you know that it is powered on.
BLU3 Nomad with backpack

Preparing the Dry Bag Float

  • The float adds additional buoyancy for Nomad and for you. Plus, it provides visibility to surrounding boat traffic. You can pack dry items inside of it.
  • Inflate on each side equally by opening the valve and blowing. Tighten the valves completely when you are done filling on each side.
  • Use a 4-inch bungee ball tie to fasten the dry bag float to the air hose in front of Nomad. The forward position connects through the attachment hanger; the rear position should wrap the hose protector and stay close to the Nomad.

Adjust your harness

  • The hose attachment rests behind your neck, leaving the smart on your right-hand side.
  • Then, pull the main strap under your right arm, behind your back, and through your left arm. Buckle it, and tighten it up. The chest strap should remain horizontal and proportional.
  • The smart reg turns on by rotating the knob clockwise. Breath a few times to test if Nomad is working adequately.
  • Attach your redundant air source. It will hang next to the air hose on the right side of the chest strap.
  • You are ready to start exploring the ocean!

Find underwater treasures with the Blu3 Nomad

A sea of coins, jewelry, and treasures is waiting for you. Learn more about BLU3, a leading manufacturer of waterproof, high-performance, and reliable underwater equipment for scuba diving here.

If you have any questions about these devices, don't hesitate to contact us!

Or chat with us and receive 24/7 assistance: https://bit.ly/ChatDetectorPower.

Previous article 4 Facts You Need to Read Before Your First Paddleboarding Experience
Next article Discover Blu3 Nemo, the world's smallest dive system

Leave a comment

Comments must be approved before appearing

* Required fields

Detector Online Training

With your new detector, you will receive a Quick Start Guide, a valuable resource designed to guide you through the essential steps of operating your new device seamlessly. This user-friendly guide is tailored to ensure that even beginners can quickly grasp the fundamental functions and features.

For those seeking a more profound understanding, a comprehensive manual accompanies your purchase. This detailed manual delves into the intricacies of your detector, providing a wealth of information for users eager to explore advanced settings and capabilities.

However, the pinnacle of expertise in harnessing your detector's full potential lies in professional training. While guides and manuals offer a solid foundation, professional training takes your knowledge to the next level. Through hands-on instruction and insights from seasoned experts, you'll gain a deeper understanding of your detector's nuances and unlock its optimal performance.

During the individual training, our detector Expert addresses your wishes and questions, provides you tips and tricks and helps you to improve your chances of success with your detector.

  • Theoretical introduction
  • Overview of the functionality and operating modes of your detector
  • Using the detector on the test field
  • Tips and tricks for advanced users
  • Improving your measurement procedure
  • Evaluation of the scans on the detector display
  • Answers to your questions

In addition to a general introduction to the functionality and operating modes of your detector, the detector Expert explains how to use the detector efficiently in the field. In doing so, he can correct small errors during the measurement and advise you on special features of your search projects.

You will learn how to check your measurements and further improve your scanning technique independently. You can also draw initial conclusions about potential target objects in the underground.

  • Service & Support: for entry-level, experienced and professional detectorists
  • Schedule: After you add the paid training, we will contact you to schedule your training with our expert.

Trainings are charged per hour! Additional costs may apply for training sessions. For special requests please contact us at info@detectorpower.com